By August, we’re all deeply settled into our summer routines; we’ve shed the strictness of the school year in exchange for a more flexible day-to-day existence, leaning on peak produce to sustain us through...
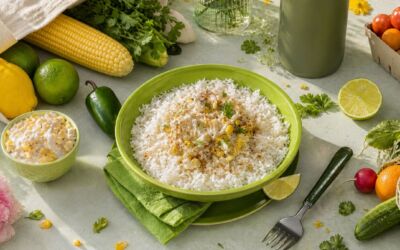
By August, we’re all deeply settled into our summer routines; we’ve shed the strictness of the school year in exchange for a more flexible day-to-day existence, leaning on peak produce to sustain us through every glorious minute of sunlight. Pop into the market, and you’ll discover stands piled high with vibrant tomatoes, sunny cobs of corn, glossy bell peppers and fragrant tangles of herbs just waiting to be turned into seasonal stunners. If ever there […]
By August, we’re all deeply settled into our summer routines; we’ve shed the strictness of the school year in exchange for a more flexible day-to-day existence, leaning on peak produce to sustain us through...
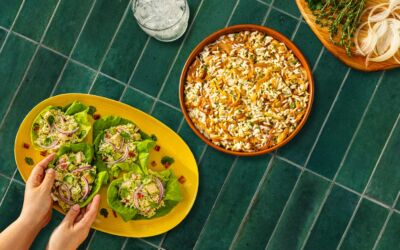
Ideal for warm weather, salads are refreshing, light, and easy to eat, no matter where you are. Great for meal prep and for using up leftovers, they’re also an endlessly creative meal that’s welcome at lunch or dinner. The only problem?...
If there’s one thing we know for certain about camping, it’s that the combination of fresh air, oodles of activities, and a relaxed attitude can really work up an appetite! Whether you’re car camping or going totally off-grid,...

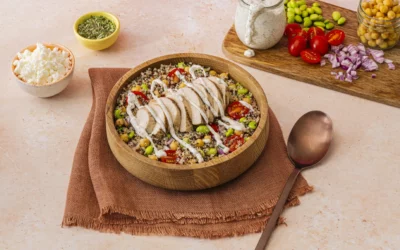
When the market is packed with produce, it’s your sign to put quinoa salads on the menu! Dishes that take advantage of the year’s freshest fruits and veggies, they also make perfect warm-weather meals. With added protein, rich flavor and...

You’ve mastered white rice, love brown rice, and turn to basmati and jasmine whenever your menu demands. Now, you can become a sticky rice expert, as well, making restaurant-style grains whenever the mood strikes! Sweet and...

A season of al fresco hangouts, barbecues, picnics, and get-togethers, summer is not the time to stress about menu planning or cooking elaborate meals. Still, with its scorching temps and unique dining locales, summer poses challenges that can stump even the most...

A day of fun, sun, gathering with friends and family, July 4th is also all about the food! This year, dig into an epic spread with 4th of July menu ideas that wow. Whether you’re hosting or simply helping out, these are the dishes you’ll want to sample on the nation’s...

If you think that the easiest way to eat well is to eat out, it’s time to take another look in the cupboard! Start by shopping wisely—lining shelves with versatile carbs and condiments, and the fridge with quick-cooking proteins, fresh fruit, vegetables, and herbs—and...

Sometimes, the supermarket is the site of your biggest dinnertime dilemmas! Faced with row upon row of products, fingers hesitantly wrapping around a box, you’ll think of the recipe you want to make and start to question the merits of sticky rice vs jasmine rice. What...

Beyond flowers and decadent treats, what’s the best way to celebrate mom on Mother’s Day? With a curated dinner—cooked by you! A small way to show your appreciation, a special meal tailored to your mom or mother figure’s specific tastes is a thoughtful gesture that’s...

Crunchy, fresh, colorful and delicious, summer salads are the perfect meals to usher you through the year’s warmest months. Delightful dishes that feature an arrangement of peak produce, they’re welcome additions to any...
A lifestyle choice or necessity, going gluten-free is now more common than ever. While some people cannot eat gluten, which is a type of protein, due to celiac disease or gluten intolerance, others opt to avoid it for personal reasons. Happily, as the number of diners...